Thursday, October 25, 2018

2D Concepts Round 01 Silhouettes/ Thumbnail

For my team's project: Il Mistero Di Cthulhu (The mystery of Cthulhu)
I am in charge of modeling the centerpiece which is the mysterious idol of Cthulhu which may contain hidden knowledge or secret that could be used against Cthulhu.

This week I've done some silhouettes for the piece that will need to be further developed to be later modeled in 3D.


3D Creating a Medium Complexity Character (Week 10)

This is the character I chose for this assignment.


For this particular assignment, I decided to start in Zbrush first instead of Maya.
I began by importing the image for reference via spotlight feature in Zbrush and began blocking out the main shape.


This is the custom brush I made for my Zbrush sculp (TentacleBrush)


This is the Icon


I made this brush for the suction cups of the tentacles for my character.


This is the result of the final sculpt in Zbrush


Monday, October 22, 2018

Creating a Simple Organic Model: Shark (Week 9)

This week I chose one of Nick's Organic Fish Designs (Shark) and Modeled/Textured/UE4 from start to finish.

This is the design I chose


I started in Maya by setting up a image plane and scale.


Then I modeled the Low Poly (Game RES) of the model in Maya. Since we only had a side view to model from it was quite challenging and time consuming. Ended up with about 1k polys.


Next I did the UV Sets for the LowRes model.


Here are some Images of the Low Poly Rendered out in Maya.


Next I created a Higher Poly version (more geometry and edges) and converted to smooth mesh in Maya. I will send the higher poly smooth mesh model into Zbrush.


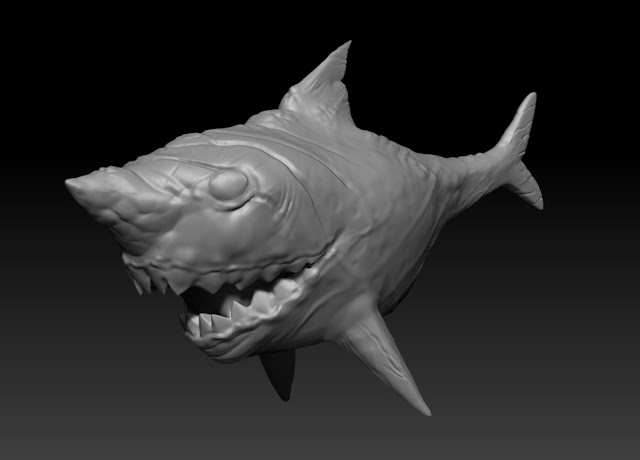
Once in Zbrush I converted the model into Dynamesh and started to add details and sculpted it.
Here is the result rendered out.


I Decimated the HighRes sculpt to keep it within 2 Million Polys


I then went into Substance Painter to bake my HighRes/Sculpted/Decimated Zbrush model into my LowPoly GameRES model. Initially I had lot of trouble getting all the details to correctly show but I later figured out the problem.


Then in Substance Painter I painted texture details... here is the result.


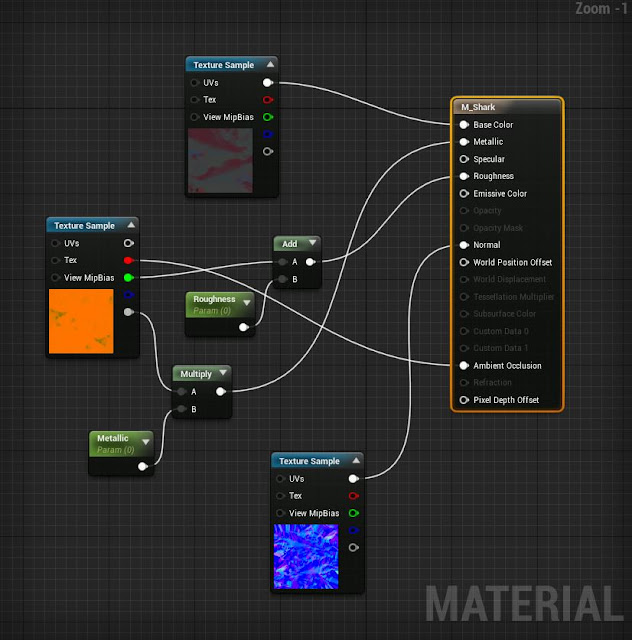
Then I exported my maps and tried to set up the material instance.


Here is the result in UE4


Thursday, October 18, 2018

Bringing it all together illustration Part 2 (week 8)

Continuing from last week... I added a background which resembles a cyberpunk city with a a dark alley way with bright neon lights...


Saturday, October 13, 2018

3D Cannon Pt:4 Working In a Game Engine with Final Prop (Week 8)

Final week of the Cannon Project...
This is my set up in Substance Painter and exported my maps.


I imported my mesh and textures into UE4 and set up my material.


This is the Final Result of the Cannon in game.

Thursday, October 11, 2018

Bringing it all together illustration Part 1 (week 7)

My character is based on movie John Carter. He is a based on western cowboy type character from the past who is warped to a futuristic cyberpunk city in another dimension. He wears a amulet in the center of his chest which he can travel between worlds.

Monday, October 8, 2018

3D Cannon Pt:3 Bake Maps and Digital Painting (Week 7)

I baked my low poly canon model and baked it into my high poly sculpted (z-brush) model in Substance Painter.

This is the Low Poly Model.


This is the High Poly Sculpted and decimated in Zbrush Model


After the two was baked....


This is the Final Result after being textured and painted in Substance Painter.

Research (Decals)

What is a Decal? Shader Used for placing material onto pre-existing material. Decal can also be layered, simple or complex It can be a...